Original DIY Halloween crafts. DIY Halloween crafts: interesting ideas and recommendations
Halloween is a modern holiday and came to us quite recently. As a rule, it is celebrated on October 31, on the eve of All Saints' Day.
The main attribute of the holiday is the “Jack-O-Lantern” made of pumpkin. Scary faces are carved into pumpkins and decorated with such pumpkins at home. They are believed to help souls find their way to purgatory. But people decorate their homes not only with pumpkins; the main decoration for Halloween is everything related to monsters, the occult, evil (bats, black cats, witches, ghosts, etc.).
If you like this holiday, then you should decorate your house in Halloween style and make sinisterly interesting crafts with your own hands.
For two bats, take two rolls of paper, a sheet of black paper, paint, preferably acrylic, it does not flow and dries quickly.

We paint the rolls with black paint. We bend one roll on top, as shown in the photo.

Cut out a 15x15 cm square from black paper. Fold it like an accordion.

We draw an ominous face on the roll with paints. We make holes on the sides (I used three types of scissors and twisted them in turn to make holes of the required size), insert an accordion made of paper into the holes, we got wings. One bat is ready.

For the second bat, cut out the muzzle and wings from black paper.

We glue all the parts to the prepared roll.

Scary stories made from paper for Halloween.
You can also decorate your home with these cute paper horror stories. Keep your children busy with interesting creativity and make a lot of new and creative crafts for Halloween.

The main colors of the holiday are black and orange, so we’ll take paper for children’s crafts of the same color. We will need two sheets of paper, which need to be cut lengthwise into three equal parts. Glue two parts from each cut sheet lengthwise to make one long strip of paper of each color.

Now we fold these strips into an accordion and glue them together at the ends to form a circle. In the middle, glue small circles or triangles on both sides at once so that the accordion circle does not turn out.

Next, we cut out the elements we need from paper and glue them, and glue a wooden stick on the back side. The result was some frighteningly funny paper decorations for the holiday.


Wall decoration with bats and ghosts.
Although it is believed that black and orange are the colors of Halloween, we will not make all crafts in this color scheme. Children's crafts should first of all be interesting to the child and attract him. So we decided to make the bats purple, and we also didn’t forget about the ghosts, because... Not a single Halloween holiday is complete without them.
Lyubov Gennadievna Pesotskaya
Today people talk about the celebration of the day of evil spirits, Halloween, more and more often, which is why Halloween crafts have begun to appear more and more often in children's creativity, especially in recent years. This holiday can rightfully be considered creative, unlike others. This is a great reason to have fun, dress up in an unusual carnival costume or make a unique craft with your own hands.
In my master class, I will tell you how, together with your children, you can quickly make crafts that are common attributes of this holiday. Here's how to make a jack-o'-lantern, a ghost garland, and a paper pumpkin. As my practice shows, children make such crafts with great pleasure and are very pleased with the results.
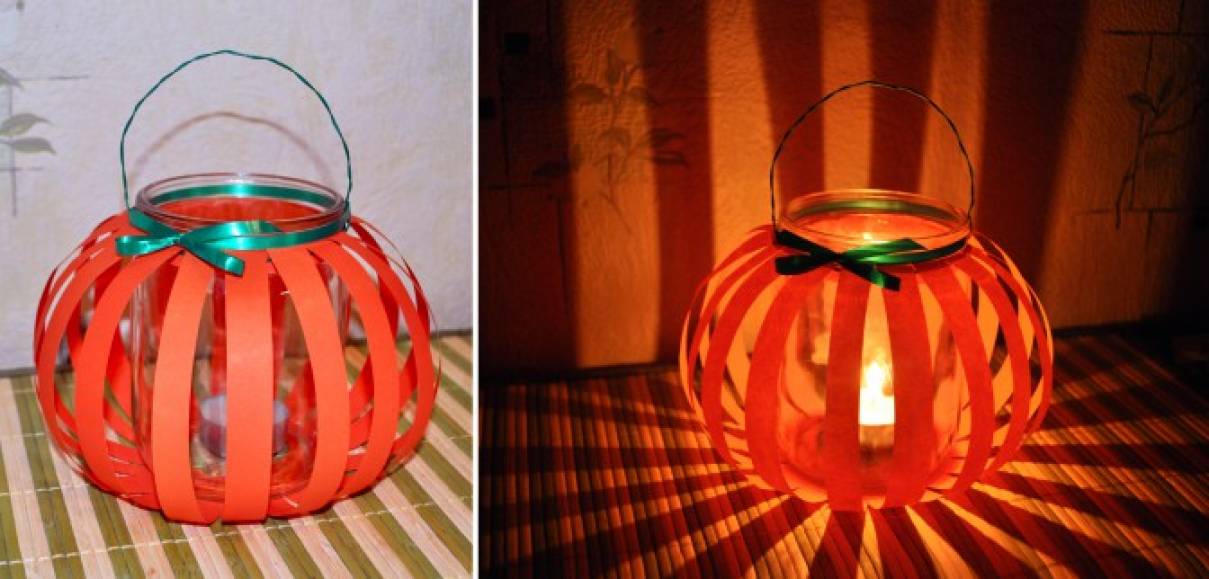
1) Pumpkin-lantern
We will need:
Glass jar
Colored paper (orange, preferably double-sided)
Scissors
PVA glue
Wire
Green braid for decoration (optional)
We cut colored paper into strips 1-1.5 cm wide. The length of the strips should be such that after gluing them to the jar we visually get the shape of a pumpkin.

Glue the ends of the paper to the bottom and under the neck of the jar using PVA glue.

We twist a handle for our lantern from wire. We also make a ring of wire under the neck of the jar and attach our handle to it. We decorate the neck with green braid. Place a candle in the jar. Our pumpkin lantern is ready! Very fast and effective!
2) Garland of ghosts
We will need:
White napkins
Something round (in my case it's candy)
Thread and needle
Black marker
To create the head of our ghost, you can use ping pong balls, cotton swabs, large beads, etc. I used candy.

Place the candy in the center of the napkin, wrap it and secure it with thread. Draw eyes with a black marker. It turned out to be a little ghost.

If we are making a garland of several, then we thread a needle and thread through each ghost. The garland is ready!

3) Paper pumpkin
We will need:
Colored paper (orange, green and brown, preferably double-sided)
Scissors
Thread and needle
PVA glue
Cut out circles from orange paper and fold them in half.

Sew along the fold line. Shape into a pumpkin. We cut out leaves from green paper and roll up a tail from brown paper. Glue it to the pumpkin. The pumpkin is ready!


I hope my master class will help diversify your thematic creativity and give children and adults joy from making simple holiday crafts.
Thank you for your attention! 
Publications on the topic:
For work you will need: watercolor paints, finger paints, paper, plastic bag, brushes, water. We tint the paper in an unconventional style.
"A flower for my beloved grandmother!" On the kindest day in the world At the brightest hour, Your grandchildren, your children We would like to congratulate you! Dear.
A handmade postcard for mom is the most valuable gift. For production we needed cardboard, napkins, a double-sided stapler.
Let me present to your attention a master class on making crafts “Water Lilies for Mom” for the holiday of March 8th. So let's get started, we'll need it.
Materials and tools We will also need a candle to “solder the edges of the ribbon”; we divide the ribbons into squares: white into three, and blue and red.
To make your gift for a celebration original and memorable for everyone, you can make a masterpiece out of a simple bottle. For this we need:.
Halloween is one of the most exciting and fun holidays. Yes, exactly cheerful ones, because in our times this day does not mean sacrifice. Dressed up children go to neighbors' houses and persistently demand worthy treats and gifts, while jokingly threatening to take revenge for their stinginess.
This section presents 30 step-by-step master classes with unique photographs - they can be made to decorate your home, as a gift to friends, or taken to an exhibition in kindergarten and school.
How to Make Halloween Crafts
The symbol of the holiday on this day is a pumpkin. Ominous slits are made in it for the eyes and mouth, and a lantern or candle is placed in the empty middle. On a holiday, a pumpkin is placed near the front door. For guests and passers-by, this means that the house is already occupied by evil spirits.
The second name of this terrible celebration is the Festival of the Dead. The Celts also believed that on this night they could mentally connect with their buried relatives. This is where the name came from.
How to decorate your home for Halloween? There is room for imagination to run wild. One condition - all decorations must be terribly funny. If you have guests this day, they should be scared and pleasantly surprised. So, let's begin.
There is one day in the year when the evening streets are filled with witches and ghosts, pumpkin heads mysteriously flicker with empty eye sockets in the windows of houses, and a vampire may knock on your door. The mysterious and creepy Halloween holiday, widely celebrated in the United States, is gaining increasing popularity in European countries, and now in our country, children and adults are looking forward to the arrival of the most mystical date of the year. For Russians, All Saints' Day has not become the main holiday, but it is an excellent occasion to get together with family or friends and decorate the house for Halloween with your own hands.

The origin of the Halloween holiday
Its roots go back thousands of years, and oddly enough, this celebration combines pagan traditions of honoring otherworldly forces and the worship of Christian saints. Hundreds of centuries ago, Celtic tribes lived in Northern France and Great Britain, who considered October 31 to be the beginning of the winter season, and at the same time the last day of the year. On the night of November 1, which the Celts called Samhain (Samhain), the gates to the other world opened, and its inhabitants burst into our reality.

They put out the fire in houses and put on animal skins and scary masks to scare away the spirits. Although you could try to appease them with treats, which should also be at the ready. All residents gathered around huge bonfires, where the Druids sacrificed animals, and then everyone carried a piece of sacred fire placed inside a pumpkin to their home. Later, with the advent of Christianity, on November 1 they began to celebrate the Catholic Day of All Saints - All Hallows Even, the abbreviated name of which later became known to all of us as Halloween.

Since then, pumpkins and fire have become indispensable attributes of the holiday, skins and masks have turned into masquerade costumes, and it is customary to treat children with sweets who go from house to house and collect tribute to the shouts of “Treat or regret!”
Preparing for the holiday and decorating the house for All Saints' Day is no less interesting than the event itself, and besides, there is plenty of room for your imagination to run wild. You need to have time to prepare costumes and masks, stock up on sweets, and decorate not only your home, but also your property.

The choice of mystical and terrifying “things” for the home is very extensive. An apartment or house can be decorated in the style of an abandoned castle or a vampire’s lair, the main thing is to use your imagination. So, what can you keep in mind when decorating your home for Halloween?

Figures and figurines
This category is one of the most impressive. If your guests are greeted at the entrance by a glowing ghost or a hanging figure of a dead bride, then the right mood will be created even before the party starts. Mummies and corpses wrapped in shrouds, ominous ghosts and monsters with pumpkin heads, rebel zombies and vampires, mannequins of ghouls and werewolves - all these decorative evil spirits do an excellent job of decorating the house for Halloween.

Flora and fauna
If you don’t like too sinister characters, you can get by with more “cute” decorations. For example, cover the walls of the room with black shaggy vines, scatter rusty chains on the floor, and decorate the tables with bouquets of black Gothic roses. Spiders of different sizes and types on the ceiling, rats in the corners, black crows and evil bats on the ceiling will complement the Halloween decorations and temporarily turn your cozy home into the dwelling of a sorcerer.

Halloween Wall Decorations
Glowing skulls, terrifying masks, giant cobwebs and bloody curtains will drape the floral wallpaper and add gloom to the holiday. There are also decorations for glass - with the help of 3D printing you can now create surprisingly realistic prints of bloody palms or stains on a window.

Arms, legs and other anatomical elements
Fans of horror films know that not a single feast of evil spirits is complete without dismembered bodies. Discreet people can be offered as home decorations for Halloween models of hands, feet, brains, eyes and other similar things, which, of course, are scary, but still, upon closer examination, turn out to be far from the original.
Table decoration for All Saints' Day
If your party plan includes a feast, then you will need table decorations. These can be candlesticks and skulls, glowing pumpkins and fortune teller balls. If guests are not squeamish, you can scatter cockroaches and mice, spiders and worms picturesquely on the tablecloth. Original candlesticks – for example, in the shape of a skeleton’s hand – will also look very impressive.

Window decorations
Stencils for window decoration can be purchased in an online store, or you can make them yourself. They can be in the form of bats, black cats, walking dead and other frightening symbols. You can cover the window with plastic cobwebs or garlands of small paper pumpkins.

Halloween decorations for the yard or summer cottage
It’s especially nice to decorate a private house for Halloween, because the scope for imagination increases. The outside of the house can be decorated with the same vines and glowing branches, and you can hang decorative moss and garlands of toadstools. An indispensable attribute is jack-o-lanterns, but they can be completely replaced by ghosts flickering from phosphorus, joyfully grinning illuminated skulls, or melted black candles. You can install a magical portal or a glowing tombstone in the middle of your lawn. Hands that have come out of the ground (by the way, you can install signs with inscriptions in them) or skeletons will decorate your home no less picturesquely for the holiday of All Saints.

DIY Halloween decorations
If you want to thoroughly enjoy the holiday and show your creativity when decorating your house for Halloween, then you can make interesting decorations with your own hands. Moreover, there are many options for such crafts and many of them do not require special materials and time.


How to make your own Halloween pumpkin
The main attribute of the All Saints Day holiday is, of course, a Jack-o-lantern made from a pumpkin. Making such a lantern yourself is not at all difficult, you just need to follow a few simple steps:
- sharpen a long and narrow knife with which you will cut out the “face” of our terrible lantern, the knife should be very sharp and not very long, otherwise it will be difficult to handle it,
- Wash and dry the prepared pumpkin. It is not at all necessary to take a round orange pumpkin; a pear-shaped pumpkin or a green pumpkin will look very stylish,
- cut off the very top of the pumpkin and remove the seeds, do it very carefully - this way your lantern will last longer and will not deteriorate,
- Take a dark marker and draw an outline, which you will then use to cut out the “face” of the pumpkin lantern. It can be evil or kind, surprised or upset - let your imagination fly!
- If you have a very large pumpkin and several small ones, you can make a whole composition out of them to decorate your home.

How to carve a pumpkin for Halloween - video
Paper Halloween pumpkin
If you don’t have a pumpkin on hand, and the holiday is about to begin, don’t worry - the main symbol of Halloween can be made from paper! To make a pumpkin from paper, we will need a sheet of orange and green thick and double-sided paper from a set for children's crafts, a pen, stationery tape or a glue gun, and scissors. Here are just two of many ways:
Method number one
- cut out strips of orange paper from 2 to 5 cm wide, depending on the size of the paper pumpkin,
- fold the strips crosswise in 4-5 pieces and fasten them at the intersection,
- we fasten 2 such “crosses” again in the middle,
- We fasten 1 strip with tape at the top so that an oval is formed, then we fasten all the other strips in the same way,
- we curl a strip of green paper about 2 cm wide using scissors,
- cut out leaves for our paper pumpkin from green paper,
- We fasten the curl and leaves at the top of our pumpkin, covering the place of fastening, the paper pumpkin is ready!

Method number two
- cut out circles of the required size from orange paper, six pieces for each paper pumpkin,
- we fold each circle into pieces and glue the halves with another circle so that we get a three-dimensional circle,
- Using scissors we give the resulting sphere the shape of a pumpkin,
- We make the tail from green paper or wrapping paper, having previously twisted it into a flagellum. Our pumpkin is ready!
You won't be able to put a candle inside a paper pumpkin, but these pumpkins make great table decorations or can be put together in a garland.

How to make a paper pumpkin - video
Home decoration ideas for Halloween - photo


We bring to your attention several interesting crafts that you can do with children on the eve of such a mystical holiday as.
So, DIY Halloween crafts
1) Jack-o'-lantern or jack-o'-lantern
This is the most important attribute of the holiday. These lanterns can be used to decorate a house, a room, or small lanterns for a holiday table. In addition, various vases are cut using the same technique. The only difference is that instead of a candle, a container of water is placed in the pumpkin.
You can read in detail about how to carve a pumpkin for Halloween, so we won’t dwell on this position for long.
2) Gauze ghosts
Children and adults love to dress up as ghosts for Halloween parties. Well, houses, apartments, rooms and even streets are decorated with crafts in the form of ghosts.
How to make such a Halloween craft with your own hands?
To make a cast you will need the following materials:
1.
A large piece of gauze.
2.
Water.
3.
Starch.
4.
Decoration materials.
5.
Plastic bottle, ball, wire for frame.
6.
Spray.
1.
First, you need to make a frame from a plastic bottle, a ball and wire. Secure the ball with tape.
2.
Cover the resulting structure with gauze.
3.
Starch must be diluted in water and applied to gauze using a spray bottle.
4.
That's all, the ghost is almost ready. The main thing is to give it time to dry. To speed up the process, you can use a hairdryer.
5.
After the gauze is completely dry, remove the frame.
6.
Using various decorative elements, we draw, sew or glue the ghost’s eyes.
3) DIY Halloween crafts - little ghosts made of gauze
They are made in the same way as the previous ones, but the frame is prepared differently and PVA glue can be used instead of starch.
Materials for making ghosts:
1.
Balloon.
2.
Gauze.
3.
Two plastic or cardboard cups.
4.
PVA glue.
5.
A bowl.
6.
Scotch.
Cast manufacturing process:
1.
We place one cup on top of another according to the bottom-to-bottom principle. We fix it with tape. Place a small balloon on top of the glass.
2.
We take gauze and soak it with glue. We place it on the structure and wait until it dries.
3.
After the gauze has dried, carefully pierce the ball.
4.
Glue or draw eyes on the ghost.
5.
We hang it from a chandelier, door, trees, or hang it on hooks.

4) Paper pumpkins
To work you will need:
1.
Orange and black paper (double sided).
2.
Black, white, green, orange cardboard for decorating pumpkins.
3.
Scissors.
4.
Glue.
5.
Skewers or straws for cocktails.
Craft making process:
1.
Cut out a strip of orange or black paper and fold it like an accordion.
2.
Roll the accordion into a circle and glue it together.
3.
We decorate pumpkins with scary decorative elements: eyes, noses, ears, eyebrows.
4.
Glue pumpkins to skewers or cocktail tubes.

5) DIY Halloween crafts - lamps made from cans
These lamps can be used to decorate window sills, furniture, porches and approaches to the house.
To work you will need:
1.
Banks.
2.
Tablet suppositories.
3.
Colored paper or paints (gouache, acrylic).
4.
Marker.
5.
Glue.
Lamp manufacturing process:
There are two options you can use.
First:
- paint the jars with gouache or acrylic paint and draw scary faces, spiders, ghosts, cobwebs on them;
- Place a tablet candle inside the jar.
Second:
- cover the jars with orange colored paper and stick on them eyes, a nose, a mouth cut out of black paper, or a scary drawing in the form of Baba Yaga on a broom;
- place a candle in the jar and light it. Now the lamp is ready.

6) Read how to cut and make bats that can be beautifully used to decorate walls.


