Making Santa Claus out of paper. DIY paper Santa Claus
New Years is soon. Of course, you will spend the evening cutting out snowflakes. Try to make yourself a fairy-tale house out of cardboard with a roof covered with snow (cotton wool), with a light (light bulb) in a small window. Place Santa Claus and the original paper Snow Maiden next to each other. A handmade granddaughter of Santa Claus using the origami technique will be cuter and dearer than the one you buy in the store.
Modular Snow Maiden
It is rare to see a man doing such needlework, the more valuable is the master class on origami from paper modules, which is presented in this video. On it, a knowledgeable needleworker calmly, thoroughly and scrupulously, like a real man, tells and shows how to make a three-dimensional Snow Maiden from modules with his own hands.
To complete the work, it is necessary to prepare modules of two sizes from paper of two colors. The scheme is quite simple. Small modules are made from rectangles half the size of those from which large ones are made.
Postcard – Snow Maiden
An excellent hand-made gift would be a Snow Maiden in a kokoshnik with a long fur coat that wraps around her.
- Draw a sketch of the postcard. Fold it in half and make sure it is completely symmetrical. Fold the sides towards the middle and make sure that the fur coat's floors slightly overlap each other. Only now can you make a blank using the template by cutting it out of thick paper.

- Using a template, cut out the “onion” for the top of the card from colored beautiful paper. Now you need to make a face. To do this, cut out a circle of pink paper, draw hair, eyes, nose and lips on it and glue it to the kokoshnik.

- From the same paper as the kokoshnik you can cut out the fur coat flaps, again using the original template. Glue white paper strips along the edges, coat them with PVA glue on top and spread a thin layer of cotton wool. Thus, we made a fur trim on the fur coat with our own hands.

- Cut out small mittens with the same edges and glue them as shown in the photo.

- All that remains is to make an origami sundress for our beauty with our own hands. Cut it out of colored paper, decorate it with snowflakes and write your wishes. Glitter can be easily applied to the kokoshnik and fur coat with regular nail polish with glitter.

An original idea can be useful for a joke or congratulations to your beloved man. Glue your photo instead of a face, and instead of a sundress, draw a slender figure of 90-60-90 in a bikini. Well, don’t forget to wish something.
Snow Maiden origami
To make an origami Snow Maiden with your own hands, you will need:
- scheme;
- a piece of blue paper with a white back;
- a piece of yellow paper with a white back;
- scissors;
- glue.
Scheme of work execution
- For origami you need to cut a square from a blue piece of paper. Fold it horizontally and vertically, unfold it, thus marking the axes. Fold two opposite vertical edges slightly. Fold both upper corners towards the middle and tuck the bottom of the fur coat.

- Turn the origami so that the wrong side is facing you. Now you first need to use a pencil to make two oblique lines from the upper central corner, dividing it into 4 equal corners, and fold the sides of the origami towards the middle. Place the lower protruding corners inside the craft, and bend the upper corner to the front side. Turn the origami over again.

- Take a strip of white paper and fold it in half twice as shown in the diagram. Glue them in the middle. The fur coat is ready.

- Now you need to make the Snow Maiden's head. To do this, take a yellow square and connect two opposite corners at the middle relative to the top corner. Fold it again too. Draw an oblique line just above the “face” and bend the origami along it. Slightly round your chin by bending the bottom corner.

- We make mittens for Santa Claus's granddaughter from two small squares of colored paper. Connect their opposite corners at the center. Fold the edge 10 degrees on one side, unfold it, marking a line along which you will bend your thumb at the mitten. Can be glued to a fur coat.

- All that remains is to make origami hats with your own hands. Take a small rectangle of blue paper and fold it in half crosswise. Fold the top corners towards the middle. Fold the bottom strips over on both sides and fold the top. We got a hat. Let's put it on the Snow Maiden's head, draw her face, and glue a bow to the tip of her braid.

This handmade doll can be hung on a Christmas tree. All the manipulations are simple, the diagram is clear, try teaching this to your child.
Santa Claus stencils for windows for the New Year 2018 for cutting are a convenient way to decorate windows for the holiday. It is enough to print it on a printer and use artificial snow or other decorative materials to decorate the window. With stencils, the ornament will turn out neat and beautiful. In this article you will find Santa Claus stencils for cutting, methods of using them and tips for creating original compositions.
Benefits of using stencils
A Santa Claus stencil on a paper window can be used to create a variety of New Year's compositions. In addition, it can be used as a New Year's coloring book for children, as well as for decorating walls and other surfaces in the house. Ready-made templates can be used not only to decorate windows, but also to master the technique of protruding. The finished jewelry looks very beautiful, but the work to create it is quite painstaking.
The main advantages of using Santa Claus stencils include:
- Versatility. Using one stencil you can make several designs on windows and other surfaces.
- Availability. You can buy stencils at a low price. In addition, templates can be made independently or downloaded on the Internet.
- Economical. If you print a stencil on thick cardboard, it can be used for several years.
- Individuality. If you use a Santa Claus stencil with deer, Snow Maiden and other New Year's characters, you can show your individuality by decorating your window so that it gives a New Year's mood not only to your loved ones, but also to ordinary passers-by.
- Ease of use. Applying a design using stencils is extremely simple.
Here are some stencil options featuring Santa Claus that you can print and cut out.
Option #1

Option No. 2

Option #3

Option No. 4

Option #5

Option #6

Option No. 7

Option No. 8

Option No. 9

Option No. 10

Option No. 11

Option No. 12

Option No. 13

Option No. 14

Features of decorating windows using stencils
If previously the main material for decorating windows for the New Year was toothpaste, then in our time there is such a device as artificial snow in a can, which is much more convenient to work with. There are two methods of using stencils - gluing them to glass or using the negative technique. The negative technique involves attaching a stencil to glass and applying artificial snow around it.
Regardless of the choice of technique for using stencils, you should adhere to these recommendations:
- When applying artificial snow, keep the can at a sufficient distance from the window. This will make the pattern uniform and also prevent the formation of lumps.
- Think in advance about what stencils you will use. In this case, you will get a complete composition, and not a set of figures.
- If you use toothpaste for the ornament, you can wait until it dries and draw additional stripes on the branches. This will help make the drawing more alive.
- It is better to use either only stencils that stick to the window, or those that work on the negative principle. On one window they do not fit well with each other.
- To glue the stencils to the window, you should soak them in PVA glue and water, and then glue them to the glass. Remove any remaining liquid with a soft cloth.
- If toothpaste is used, it should be white and free of impurities.
Creating a New Year's drawing on a window using a stencil
If you want to decorate a window for the New Year, we recommend using a stencil of Santa Claus on a sleigh on the window, with which you can create unusual protrusions.
To create them you will need thin scissors, a stationery knife, and a wooden board. You need to find a template, download it, print it. Then remove excess areas using a utility knife. All that remains is to fix the template on the glass and draw the ornament using toothpaste, soap or artificial snow.
On this page you will find original Santa Claus stencils for windows for the New Year 2018, which can be printed and used to create a bright and fabulous atmosphere on the eve of the winter holidays.
DIY Santa Claus made from paper- This is an interesting option for children's creativity in winter. You can do such crafts in kindergarten, in primary school, in the company of children in extracurricular activities, and with parents at home. Paper is a very simple material that will be interesting to work with both very young children and adults, and for each age category we have interesting techniques, which we will talk about in more detail today.
The paper plate needs to be folded, but not in half, but about a quarter of the plate, we will use the remaining part to create a face for our Santa. We will also need beige paints (you can mix white and yellow). With these paints we need to decorate the inner circle of our plate, leaving the wavy edges white.

It will have a fluffy nose, we will make it from threads following the example of a pompom for hats, using yellow or orange threads. The pom-pom for the cap can turn out to be just as fluffy, or it can be cut out from white paper. Near the nose we will have a mustache consisting of two elements that need to be cut out. The eyes can be made from two parts: cut out a white and black circle, the black one should be smaller in size and glue them together, placing one on top of the other, and then glue them to the plate. Our face is ready.
All that remains is to decorate the sharp edge of the triangle with a white pom-pom circle for the hat. And glue a paper rectangle over the plate - a strip that will mark the beginning of the cap. To make it look like this DIY paper Santa Claus, diagram you won’t need it at all, you can look at the photo example and repeat it using the materials available to you for children’s creativity.

DIY paper Santa Claus: diagram
You've probably already looked at a lot of master classes on the Internet on how to make one, but most of the descriptions presented are more suitable for adults; these ideas will be too complex for children's creativity. It will be interesting for kids to work with multi-colored paper sheets, sheets of cardboard, cut out various figures with scissors and glue them to the surface.
First, you can watch with your child on the computer how it’s done. DIY paper Santa Claus video, and then invite the baby to make the same figure on his own.

The main decoration of Grandfather Frost is, of course, his luxurious beard, and we definitely have to make it for our paper old man, besides, it’s so easy to implement using only white paper and scissors.
However, before making the ford, we need to complete the base; for this we will use colored cardboard - preferably choose red. The cardboard can be one-sided, because we will roll it into a cone. We will also need a sheet of plain paper or corrugated paper; it will definitely make a voluminous and curly beard. As always, the main assistants in completing this children's craft will be ordinary stationery scissors and PVA glue.
On the cardboard you need to draw a contour: a circular sector (almost a semicircle). You can see which figure should be drawn on cardboard in the step-by-step master class. From this sector we will make the basis for our future craft. The most beautiful and bright base will be red, but you can also use blue cardboard. Such figures will become an original decoration for the New Year tree, and even preschool children can complete the task without the help of adults.

Do-it-yourself voluminous Santa Claus made of paper we will have it on a cone-shaped base, so the semicircle needs to be rolled up and the edges glued together. The joint can additionally be taped. The base can be in the form of a non-sharp cone, i.e. At the back you will staple only the edges of our circular sector.
We need to cut out a small circle from a white sheet of paper, this will be the face of our craft, and a long white strip, from which we will make a curly beard and bangs.
Now he will process the edge of the white strip: one side must be cut into strips, without cutting to the end, since in children's appliqués we make grass under a tree or flower. Since our beard should be curly, we can add volume to it by twisting the stripes onto a match or pen rod. Now you will see how luxurious the beard of the future main symbol of the New Year turned out.
DIY Santa Claus from colored paper can become a toy on the New Year tree, but for this you need to make a loop on top. You should cut out two mittens from brown cardboard; if you don’t have cardboard of the corresponding color, you can cut out the elements from white paper and then paint them with the chosen color or even make an interesting geometric pattern on the mittens. The mittens should be glued to the sides, slightly below the head.
In the middle of the base on the front side, we first glue a white circle, draw eyes and a mouth on it, make a carrot nose, glue a piece of “curly” paper on the sides, below and above the face. When the glue dries, our craft is ready to become an interior decoration.

DIY Santa Claus from colored paper
DIY paper Santa Claus toy in the origami technique, this is a task for a real master, at least that’s what it seems when you first see the diagram for its implementation. But if the kids enjoy making paper boats and airplanes, then you can focus their attention on other figures that can be made using this oriental technique.
If you make several of these figures, then by attaching them to a thread, you will get an original New Year’s garland that you can use to decorate a child’s room where it is too early to put up a Christmas tree or hang Christmas balls.
This craft will be a great pastime for the whole family; you can organize a small family competition to see who can create the most beautiful Santa Claus using the origami technique.

We will make origami from a colored sheet: on one side it should be red and on the other white. The sheet must be given a square shape by cutting off the excess part. Origami is always performed according to the following pattern: a square sheet is folded in the correct sequence until the required flat figure is obtained. The origami technique is famous for the fact that it allows you to get a bizarre, complex figure without using a drop of glue or scissors to create it.
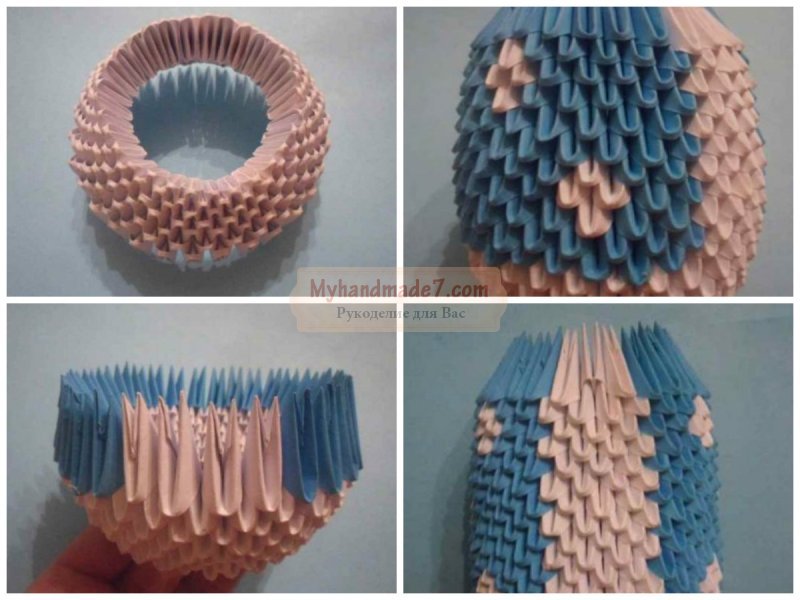
Older children will be interested in the technique of modular origami, where it is necessary to create a three-dimensional figure from paper modules. The folded “triangles” are fixed together in a chain without glue, thus forming layers. You can use triangles of different colors - in this case, our choice fell on blue and white paper. Following the diagram, you can make your figurine with an original pattern on the “fur coat”.
DIY paper Santa Claus: template
When children perform DIY Santa Claus made from paper, template It can be useful. You print the template on a printer on white or colored paper, then cut out the elements along the contour with scissors. The children's task is to glue the elements to the base so that they form a picture, in our case it should be Santa with a curly beard.

Mothers always choose complex New Year's crafts: they create life-size Santa Claus and the Snow Maiden, guided by the technique of creating dolls from nylon tights, and sew for them, sometimes even embroider fur coats with beads, felt felt boots from wool, and make painted kokoshniks for the Snow Maiden.
DIY paper Santa Claus
Santa Claus made of paper like a nesting doll
This craft will not only help develop children's creative imagination, but will also serve as an excellent educational toy. For this craft you will need boxes of different sizes, paper, paints and a felt-tip pen. Cut out the bottom from below. We cover the boxes with white paper, and on it we make an applique of colored paper in the form of Santa Claus, and then we outline everything along the contour with a black felt-tip pen, or we draw Frost with paints. The easiest option is to print a stencil and stick it on thick paper, and then glue it on the sides.
You can very easily make a real exhibition out of paper. You can make not only Santa Claus, but also his faithful assistants elves, deer, his beloved granddaughter Snow Maiden, a snowman and even a snowman.

Another way to make a cute Santa Claus out of paper, only it will be voluminous and can be seen from all sides.

Another cute version of Santa Claus made from paper. All you need to do is click on the link, download the file and print it on your printer. That's all. Now cut out all the details with your baby and glue them together, creating a charming Santa Claus.

I think your child will appreciate such a cute accessory as a Santa Claus hat, especially since it is very simple to make. You can download the template from the link.

Finger puppets of Santa Claus and reindeer
If you are planning to spend the New Year in a cheerful company with many children, then as entertainment you can invite them to play with paper dolls, which they can easily make themselves. Download the templates in advance and distribute them to the children at the party.

Well, what's the New Year without Santa Claus? Paper is the most affordable material for making New Year's crafts. It is from paper that we will make the main character of the New Year.
To make Santa Claus you need:
Paper for printing templates (it is better if it is thick enough);
Scissors;
Glue, brush
Step-by-step process for making Santa Claus
1. Print the templates on a printer.

2. Cut out all the details of the craft.
.jpg)
3. Bend Santa Claus' fur coat along the fold lines.
.jpg)
Glue the edges of the fur coat and the top part at the allowances.
.jpg)
4. Bend along the lines of the sleeves and glue them together.
.jpg)
5. Glue the sleeves to Santa Claus’ fur coat (gluing points A and B).
.jpg)
.jpg)
7. Bend the collar along the fold lines and glue its edges together using the allowance.
We put the collar on the fur coat.
.jpg)
8. Take the “face of Santa Claus” detail and use a brush to twist the beard so that the beard “curls”.
.jpg)
9. Glue the face of Santa Claus to the fur coat (gluing location B).
.jpg)
.jpg)
10. Santa Claus is ready!
.jpg)
This toy will be an excellent decoration for the New Year's interior or a gift.


