DIY crafts for Mother's Day for kindergarten and school. How to make original crafts from napkins and colored paper for Mother’s Day – master classes
Mother's Day Crafts
===================================
CRAFTS FOR THE DAY MOTHERS from napkins.
Necessary materials for crafts from napkins for Mother's Day :- red cardboard sheet
- stationery glue pencil
- paper napkins (pink and white)
- narrow satin ribbon or braid
- scissors
- double sided tape
- simple pencil
- template in the shape of a child's palm
- yellow colored paper
- a sheet of white landscape paper
Step-by-step instructions for DIY napkin crafts for Mother's Day:
1.Draw a large heart on a sheet of red cardboard by hand, and then carefully cut it out with scissors.
2. Turn the heart over with the white side facing you, attach a template of a child’s hand to it and trace it with a simple pencil.
3. Take several white and pink napkins and cut them into four identical strips. Then cut each strip with scissors into squares measuring 3x3 centimeters.
4. Roll the napkin squares into lump balls, being careful not to press the paper too hard. The final round should be slightly fluffy, not hard. There is no need to wet the napkins with water during the manufacturing process.
5. Gently coat the drawn palm with glue along the contour and lay it out in snow-white lumps. Then fill the entire internal space with them. Place the balls close to each other.
6. When your palm is filled with balls, set the workpiece aside for a while so that everything sticks well. Then cut a piece of satin ribbon or braid of a suitable length and glue it to the top of the heart using double-sided tape. This is a suspension loop.
7. Grease the empty surface of the heart on the outside with glue and lay it out with pink lumps of napkins. Move from the edges to the middle and place the lumps as close to each other as possible so that there is no gap between them. Place the balls adjacent to the white palm especially carefully so as not to disturb the shape of the hand and fingers.
8. Take a white sheet from a regular sketchbook, draw a flower with petals on it with a pencil, cut it out with scissors, and glue a bright yellow eye in place of the middle. Twist the edges of the petals slightly and glue the chamomile to the heart.
9. Glue a handwritten or printed holiday poem to the back of the item.
Postcard "To the best mother!"


Craft for Mother's Day from tablets

Mother's Day is approaching. On the eve of this holiday, we are thinking: what to give to our beloved mother? You can find the answer to this question in our article. We have prepared some great ideas for DIY gifts.
You will need: 3 sheets of A3 format, black paper for pastels measuring 50x65 cm, scrapbooking paper of 2 types (red and with flowers), Moment Crystal glue, pencil, ruler, red satin ribbon, mug, 4 candy bars.
Master Class
- Take an A3 sheet of paper and draw out the diagram of the box.

- Take another A3 sheet and redraw the side edges of the box.

- Take the third A3 sheet and redraw the diagram of the box lid.

- Cut out the parts from 3 sheets.
- Glue the side edges of the box.
- Fold the edge of the lid 2 times inside.

- Secure with glue.
- Cover the sides of the box with black pastel paper.
- Cut out a blank from black paper according to the lid pattern.
- Cover the lid with black pastel paper.
- Cut out 4 rectangles measuring 15x16 cm from black pastel paper.
- Cut 4 rectangles measuring 13 x 14 cm from red scrapbooking paper.
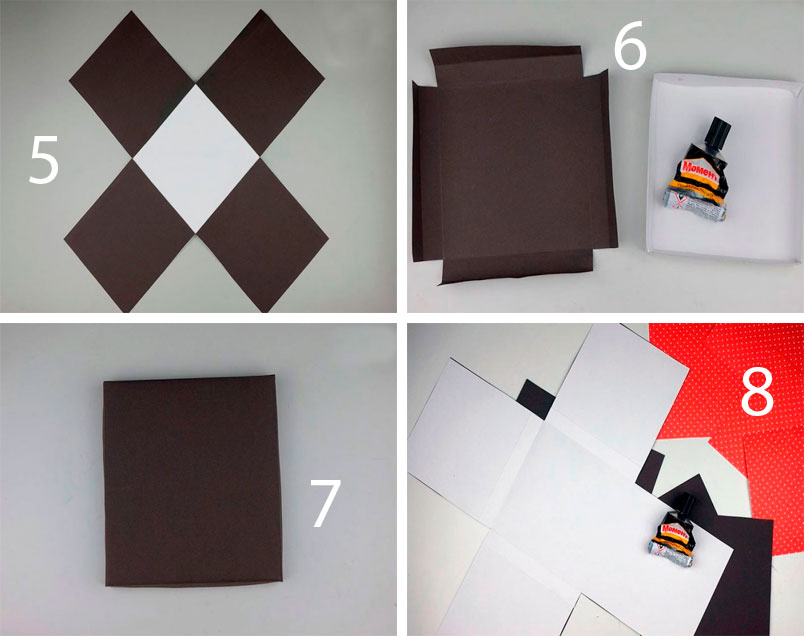
- Cover the inside of the box with black rectangles.
- Place a piece of red ribbon in each direction.
- Glue the red rectangles to the inside of the box on top of the ribbons.
- Cut out a 15x16cm rectangle from floral scrapbooking paper.
- Glue it onto the center base of the box.

- Cut a 13 x 164 cm rectangle from floral scrapbooking paper and glue to the lid.
- Place 4 bars on the sides and tie with ribbons.
- Place the mug in the center, lift the edges and close the lid.

- Decorate the lid with ribbon and tie a bow.
Tulips made of corrugated paper and sweets
You will need: corrugated paper of your favorite colors for buds, green corrugated paper for leaves, Raffaello candies, double-sided thin tape, green tape, satin ribbon, packaging material for a bouquet, scissors, wire, pliers, a wooden stick, optionally transparent beads to create dew , glue gun, tweezers.
Master Class
- Prepare the wire by making the required number of stems of equal length.

- Cut long strips of corrugated paper, cut the long strip of corrugated paper into 2 pieces, then cut into 4 pieces. You should get 8 strips, 6 of them will be needed for the tulip bud.
- Turn each strip over the center, folding it so that the right sides of the strip are pointing in the same direction.

- Make 6 blanks in the same way.
- Attach double-sided tape to the tip of the wire.

- Attach the candy to the tip of the wire.
- Assemble a tulip bud in this way: take the first petal and attach it to tape. Place the second and third petals near the candy and, holding them with your fingers, secure with tape.

- Attach the remaining petals in the same way, forming a tulip bud and securing with tape.
- Trim the excess ends of the crepe paper at an angle at the base of the bud.
- Wrap the stem with tape.

- Cut a strip of green crepe paper.
- Cut into two almost equal parts.
- Fold each part 4 times and cut out the leaves.
- Pull each leaf out in a spiral using a wooden stick.

- Place a short leaf and a longer one below. Secure each leaf with tape. The tulip is ready! Make the required number of tulips of different colors.
- Assemble tulips into a bouquet in this way: connect 2 tulips and tie them with tape, then add one tulip at a time, placing the colors in a checkerboard pattern.

- Cut 20 leaves and place them around the perimeter of the bouquet, securing with tape.
- Wrap the bouquet in wrapping paper and tie with ribbon.

- Create dew drops on tulip buds by gluing clear beads using tweezers and hot glue.
Vase using decoupage technique
You will need: glass jar, acetone, cotton pad, sponge, decoupage napkins, brush, PVA glue, acrylic paints, twine, scissors, water-based acrylic varnish.
Master Class

A vase made from a jar using the decoupage technique is ready!
Fashion necklace
You will need: large colored rhinestones, plastic mesh or thick leather, satin ribbon, superglue, wire cutters, round teeth, gold wire, scissors, a simple pencil, a plate.
Master Class

Fashionable necklace is ready!
Salt dough pencil
You will need: water, flour, extra salt, cardboard jar for the frame, PVA glue, scissors, a piece of decorative rope or corrugated paper, gouache, brush, button, stacks, acrylic varnish for crafts, toothbrush.
Master Class
- Knead the salted dough in this way: add a glass of flour, a glass of salt, add water, then knead until the desired consistency of the dough. Separate part of the dough, add beige gouache, then knead.
- Roll out the cake to a thickness of 10-15 mm.

- Apply PVA glue to the outer rim of the jar and wrap it with dough. Cut off the excess with a stack and smooth the joints with a damp brush.
- Create a small dotted texture with a toothbrush on the surface of the dough.
- Knead the brown dough, roll it into a flat cake 10-15mm thick.

- Cut a 5cm wide strip of brown pastry and glue it to the bottom of the jar.
- Make 2 large owl eye bases from white dough, then glue them on.
- Make a beak out of brown dough and glue it on.
- Make eyes from turquoise dough and glue them on.
- Roll out 8 strips of pink dough, twist them into 4 flagella and make a bow, then leave it to dry for 2 hours.
- Make droplet-shaped owl wings using brown dough, then glue them on.

- Weave ropes of beige dough and glue them onto the neck of the jar.
- Roll out a sausage from white dough, draw the texture of the lace with a stack and glue it as a collar under the beak.
- Place the craft in a warm place for a day.
- Paint the bottom and wings with brown gouache and decorate with white dots.

- Draw the pupils and eyelashes with black gouache, wait until the paint dries, then paint white highlights on the eyes.
- Glue a pink bow above the wing.
- Glue a button with a bow from a corrugated strip onto the lace.
- Cover the craft with varnish and wait until it dries completely.
The salt dough pencil is ready!
Head wreath made of foamiran
You will need: foamiran 0.5 cm thick (orange, yellow, cream, light green, dark green and red), scissors, toothpick, curly scissors, oil paint in autumn shades, sponge, sheet of paper, iron, floral wire, ruler, super glue, lighter, lilac clay (for blueberries) or beads, tape, foil, wire at least 2 mm thick and 60 cm long, ribbon or string, mold (leaf shape).
Master Class
- Print or draw leaf templates, then cut them out.

- Trace the templates onto foamiran with a toothpick, then cut them out.
- Make a sufficient number of multi-colored leaves, for example 60, remember, the more there are, the more magnificent and beautiful the wreath will look.

- Add realism to some of the leaves by trimming the edges with scissors.
- Scratch a small part of the leaves with a toothpick.
- Tint the leaves in this way: apply a little oil paint to the sponge, blot a sheet of foamiran, then remove the excess with a piece of paper.

- Combining colors: color the yellow foamiran leaf with light green and brown paint. Also, color some yellow leaves with orange, red and light green paint. Tint red leaves with brown, green leaves with burgundy, brown and dark green.

- Preheat the iron on the second setting, apply the sheet for 2 seconds, remove it and press it onto the mold to make an impression of the sheet. Repeat this process with all the leaves. Please note that this should be done quickly and very carefully, as foamiran is highly flammable. If you are new to this business, it is better to skip this point and proceed further.

- Cut the floral wire into 7 cm long pieces and make a loop at the end.
- Glue the floral wire to the front side of each leaf using super glue.

- Treat the edges of the leaf with fire using a lighter. The edges should be realistically curved. Repeat this process with all the leaves. Do this carefully, I remind you that foamiran is highly flammable.

- Roll a ball of purple clay the size of a blueberry. Make 15 berries, place each blueberry on a wire with a loop coated with super glue. Using the tips of a pair of scissors, score the tops of the blueberries and set aside to dry. Beads can be used as blueberries.

- Start assembling the wreath in this way: form small bouquets of leaves and berries, secure them with tape.
- Cut rose petals in the shape of a drop from red foamiran. One bud will require 10-15 petals. The number of buds depends on your desire; you can make from 3 to 7.

- Tint the edges of the petals with brown oil paint.
- Make the petals thinner in this way: heat the petal on the iron for 2 seconds, then fold it into an accordion and rub the petal with your fingers. Open the petal and create an indentation and curl the edge of the petal outward. Repeat this process with all the petals.

- Finish the edges of the petals using a lighter.
- Roll up a foil drop, make a loop on the wire, apply super glue and put on the foil drop.
- Glue 2 petals opposite each other and form a bud by gluing the petals in a checkerboard pattern, opening the flower slightly. Form the desired number of roses in the same way.
- Make the base for the wreath by cutting 60 cm of wire. Make loops at the ends.

- Cut the tape into 15 cm long pieces, fold each piece with the sticky side inward and cut lengthwise into 2 halves.
- Open the end of the tape, apply it to the base 10 cm from the edge and wrap the wire around it.
- Attach bouquets of leaves and berries, securing with tape.

- Weave them in the order you like best.
- Don't forget to insert roses in the spaces between the leaves.
- Attach a string or ribbon to the ends of the wreath.
The foamiran head wreath is ready!
Exquisite topiary
You will need: cream-colored sisal, alabaster, glue gun, newspaper, flower pots, yarn, barrel, scissors, decorative elements - flowers, beads...
Master Class

Exquisite sisal topiary is ready!
Handmade soap
Advantages of this soap: It has antibacterial and scrubbing properties, is ideal for oily and problem skin, and has a pleasant aroma.
You will need: 100 grams of soap base, zest of half a lemon, a teaspoon of liquid honey, a teaspoon of dried lavender flowers, 5 drops of lavender essential oil, 2 drops of lemon essential oil, mold, dishes.
Master Class

Handmade lavender-citrus soap is ready!
Book safe

On November 25, 2018, Mother's Day is celebrated in Russia. It’s great that they came up with a holiday for our mothers. We so rarely tell them about our feelings that even if this holiday did not exist, it would be worth inventing it. How can you express your love to your mother if not with a handmade gift? These gifts are made with soul, imbued with warmth and gratitude. On the eve of the holiday, the NNmama.ru portal has prepared for you a selection of interesting DIY gifts for Mother’s Day.
DIY Mother's Day gifts
Card with balloons
You will need:
- photo of the child (from whom the gift);
- scissors;
- air balloons;
- multi-colored threads;
- a white sheet of cardboard or colored paper;
- a sheet of colored paper;
- PVA glue.
2. Inflate small balloons.
3. Tie with multi-colored woolen threads. It is better if the ends are long, so the card will look more impressive.
4. Glue colored paper, slightly smaller than white, onto a white sheet of paper.
Your gift is ready!
Flower vase

You will need:
- green paper;
- napkins or corrugated paper;
- scissors;
- glue.
2. The resulting parallel lines must be cut to a horizontal line not reaching 3 cm from the edge.
3. Unfold the sheet with the cuts.
4. Turn the sheet out the other way and fold it, retreating 1 cm.
5. After this, coat with glue and glue.
6. When the paper sticks well, roll the workpiece into a tube.
7. The result is a stable vase with petals.
8. Make flowers from a napkin or corrugated paper.
9. Glue the finished flowers to the stems.
10. You can decorate the resulting bouquet to your liking, for example by gluing sequins or tying it with a satin ribbon.
Idea: The flowers can be made multi-colored and then decorated with beads. If the option with glue and paper does not suit you, then take a regular jar, paints and a glass of water. Draw flowers on the jar and you will be happy.
Gift decorative candle

You will need:
- candle;
- baking paper;
- paints.
2. Then attach the drawing to a thick candle and fix it. Next, treat the candle with hot air, such as a hairdryer. Beautiful candles are ready.
Idea: you can write an original congratulation or message in verse.
Application "Sun for Mom"

You will need:
- ribbons;
- pasta;
- glue;
- colored paper;
- paints.
2. A sun is formed from round pasta. All elements are glued with glue.
3. Then the eyes are glued to the main circle.
4. Then we glue multi-colored strips to the circle, which will symbolize the rays.
5. Pasta-bow is glued to the end of these rays.
6. And in order to decorate the craft and make it even more interesting, use flowers that are glued to the top of the sun.
Wish flower

You will need:
- colored paper;
- scissors;
- glue.
2. Then cut out the flowers with scissors.
3. Collect a flower.
4. Glue all the petals together with a ribbon, and make the middle from squares. The size of the squares should be 3.5 cm by 3.5 cm. Fold them in the shape of a frog. Glue all the resulting blanks together, and then glue them to the middle of the flower.
Idea: If you don’t have a printer, you can draw a flower and write wishes or compliments by hand.
flower bed

You will need:
- glue;
- double-sided colored paper;
- scissors;
- pen or black felt-tip pen.
2. Then find the middle and glue the two parts of the workpiece together to make a lush fan.
3. Now the most creative process, draw any flowers, lilies of the valley or tulips. Cut them out.
4. You can give the children ready-made templates, or you can have them draw and cut them out themselves.
5. Then spread the finished pieces on the fan using glue. A good mood for children and mothers is guaranteed!
Application "Calla lilies" made from cotton pads

You will need:
- glue;
- paints or markers;
- cocktail straws;
- cotton buds.
2. Use a felt-tip pen to color the cotton tip.
3. Insert a cotton swab into the cocktail straw.
4. Place a cotton pad under the finished structure.
5. Apply a little glue to the bottom edges of the disk and press the edges together. A couple of minutes and the flower is ready.
The entire bouquet is made in this manner.
3D 3D postcard

You will need:
- double-sided colored paper;
- cardboard;
- ruler;
- scissors;
- glue stick;
- markers.
2. Fold it in half and get a smaller right triangle. Bend it in the middle again. We press the smaller side to the larger side. On it we draw the rounded edge of the petal.
3. All that remains is to cut the flower along the marked line and straighten it.
4. Now let’s cut off one of the flower’s petals. This is necessary so that it turns out voluminous.
5. Let's outline the edges, then the flower will become more realistic. We do not touch one of the petals near the cutout, since we will glue another one onto it.
6. Now we put the painted petal on the one that we did not touch and glue them together.
7. Color the core and continue making 6 more of the same colors.
8. Bend the resulting flowers in half. We collect it in a bouquet. We glue two side petals to one flower, on both sides.
9. Glue another one to the top flower, but already with three petals.
10. Glue two more flowers on the sides.
11. And we place the last flower up.
12. Cut out two hearts from cardboard, matching the size of the bouquet. The red should be larger than the white. Place the white heart on top of the red one and glue it on.
13. On the other side, glue a white, slightly smaller one to the red heart, and another smaller red one on top of it. Bend it in the middle. As a result, we got a card of four hearts. It is white on the inside and red on the outside.
14. Now glue the bouquet using the top petal to one side of the heart. In the same way, glue the bouquet to the second side of the card. Ready!
Bouquet of spirals

You will need:
- colored paper - double-sided in different shades;
- PVA glue;
- scissors;
- simple pencil.
2. Choose your favorite shade of colored paper, then draw a circle with uneven (wavy) edges.
We bring you the best for Mother's Day. What gift to give for Mother's Day 2019 - these are the questions that a lot of boys and girls will be concerned about on the eve of the 2019 holiday.
Since our children do not go to work, and, more often than not, they do not have a budget for purchases, their solution is cute homemade gifts.
To make your mother's gift for Mother's Day pleasant, original and cute, we have prepared for you 10 ideas that your child can handle. Of course, the help of conscientious adults is welcome.
What to do for mom on Mother's Day: DIY gift ideas
DIY colorful hyacinths as a gift for Mother's Day
.jpg)
.jpg)
DIY soft tulips as a gift for Mother's Day
For those who know how to sew, we suggest making a bouquet of soft tulips with your own hands as a gift to your mother for Mother’s Day 2019. Even when made from fabric and padding polyester, these amazingly delicate flowers do not lose their charm!
You will need: bright fabric for buds, green fabric for legs and leaves, filler, wire for rigidity.
Sew the legs, turn them inside out, fill them with stuffing, insert the wire, sew the buds, turn them inside out, fill them with stuffing, sew them to the legs.

You will need: small ceramic flower pot, sand, flat pebbles of different shapes and sizes, corrector.
Select pebbles shaped like cacti, paint them with green paint, and make needles with white corrector.
Place the pebbles in a ceramic pot, cover it ¼ full with sand - your cacti are ready. Alternative option - .

Flower heart - beautiful
A gift for mom speaks of love, and the symbol of love, of course, is the heart. We have found a fairly simple way to make a heart bloom and present it to you.
You will need: small roses, live or made of paper, cardboard heart, stapler, string for hanging.
Draw a heart on the cardboard, cut it out, hang the cardboard blank on a string. If you choose fresh roses, cut small branches with buds from large ones and use a stapler to secure them to the heart.
If you opted for artificial ones - first Fill the entire heart with buds - your gift for Mother's Day 2019 is ready.


Rainbow beads as a gift for Mother's Day 2019
To make it, you can use cold porcelain, tree branches, lace and many, many other materials at hand.

Tapestry - an idea of what to give mom for Mother's Day
To make such a tapestry for a gift for mom on Mother's Day, the child may need the help of an adult.
You will need: wooden frame, nails, hammer, thread, large needle.
First, you need to nail the nails to the wooden frame on which the base will be attached. Then wind the threads, and begin to weave the tapestry, as shown in this one.

What to give mom: paintings of leaves and flowers

Now you know 10 DIY gift ideas for mom on Mother's Day. We hope you have found the right option for what to give your mom for Mother's Day, and she will love this homemade gift.
In contact with
Purchased gifts are good when given by adults. Children's crafts for mom's birthday will bring a lot of joy and trembling excitement. They say that the child with all his heart wants to please his mother. A child’s creativity cannot be replaced with expensive gifts.
 A child’s creativity cannot be replaced by expensive gifts.
 Features of creating crafts
Crafts for mom's birthday most often become the first children's gift. Such creativity begins with a simple drawing and an attempt to write a message to mommy.
With age, the desire to please a loved one becomes a need, and the search for an idea begins long before the event. Modern children get them from the Internet, but dad shouldn’t stand aside. He can unobtrusively support the child’s initiative and help in making a choice.
A birthday gift for mom - a craft or something else - can be very simple. It is important that it is made with your own hands. In production you can use paper, fabric, thread, plasticine, plywood, plastic. The combinations of their natural raw materials – twigs, leaves, etc. – look original.
Basic principles of creating crafts for mom:
- Voluntariness. A child should never be forced to give a gift. The child himself must express such a desire, but helping him with this is the responsibility of an adult.
- Independence. The child himself must choose the idea for the craft. Both the gift and the creative process should be liked, first of all, by himself.
- A sincere desire to please my mother.
- Individuality. The child will subconsciously add his own twist to the craft, which will touch the mother.
- Color color. Bright colors give the gift a special festiveness and solemnity.
- Size. The craft should not be made too large.
- Sensuality. If the craft takes into account certain character traits of the mother, this will evoke special feelings in her.
- Absolute safety and harmlessness to the child during the manufacturing process.
Ideas for children's crafts should be appropriate to the child's age. The simplicity of your baby’s crafts will evoke a special maternal tenderness and will remind her of this time for a long time.
Don't try to complicate them. In adolescence, on the contrary, one should highlight the abilities of a son or daughter (the ability to draw, sew, knit, cook, or simply a penchant for creativity). Mom can show off this gift to her friends
 A birthday gift for mom - a craft or something else - can be very simple. It is important that it is made by hand
 Paper crafts
One of the simplest, most accessible and common craft materials is paper. It can be easily processed and can be used by children of any age. White and colored, thin and thick, smooth and corrugated paper is used. You can make both flat and voluminous crafts from it.
Postcards
One of the simplest options for paper crafts is postcards. In this case, you can use different techniques depending on the child’s age and abilities:
- Hand-drawn postcard. The range is wide - from the scribbles of a child to the small “masterpieces” of a novice artist.
- Application. On a sheet of thick (preferably glossy) paper, you can create a picture by gluing various figures from colored paper, scraps of fabric, thin multi-colored plastic.
- Volumetric postcards. Not only an applique can be glued to the surface of a thick sheet. A three-dimensional picture can be created by attaching beads, buttons, threads and ropes, twigs and various miniature, three-dimensional figures.
- Volumetric opening card. Its essence lies in the fact that when you open a folded sheet of paper, figures rise in the center, creating a three-dimensional picture. The simplest option is done this way: a sheet of thick paper is folded in half, paper balls and various flat multi-colored figures, as well as a sign with congratulations, are rigidly attached to the fold line. Now, if you open the sheet, then all the fixed elements will rise vertically in the center.
- Computer processing. Teenagers who are able to work on a computer independently can print postcards with the most original content.
- Postcard photo. Using a family photo with a beautiful design will appeal to any mother.
Important! DIY postcards can be made in different ways.
The most important thing is to accompany any picture with congratulations and wishes, which must be sincere.
 The most important thing is to accompany any picture with congratulations and wishes, which must be sincere
 Origami
Volumetric paper crafts using the origami technique look very beautiful and are quite simple to make.
The following ideas may interest your child:
- Fan. To make it, you will need a strip of thick paper about 100 cm long and 14-16 cm wide. On it, in a chaotic or specific order, multi-colored elements are drawn with a felt-tip pen - circles, lines, various geometric shapes, the sun, stars, etc. Whatever your own imagination suggests. The brighter the coloring, the better. An “accordion” is formed from the strip. Its edges are connected along the entire cut line, and a handle (for example, a popsicle stick) is glued at the junction. The joint can be reinforced with a strip of tape.
- Flowers. You can use paper of any bright color. From a sheet of A4 colored paper, make a square along the short side, bend it in half, and then diagonally. The sheet unfolds and bends in half in the other direction, after which it folds into a double triangle. Both lower corners of the triangle are connected to its vertex. 5-7 pieces of such parts are produced. They are applied to each other until the flower is formed. They are connected together by carefully bending the leaf.
A colorful bouquet is made.
 Volumetric paper crafts using the origami technique look very beautiful and are quite easy to make
 Modeling
A craft for mom can be made from plasticine or salt dough. If the first material is more suitable for little ones, then you can create from dough at any age. On their birthday, mothers often receive gifts from their sons made by modeling.
Plasticine can be used not only to create various figures. The original vase will be made from a bottle covered with plasticine. You can form various reliefs and ornaments on it. Using materials of different colors, it is possible to sculpt a bright pattern. One option for a vase is to cover a bottle or jar with plasticine “sausages.”
 On their birthday, mothers often receive gifts from their sons made by modeling
 Once hardened, salt dough produces durable products. By adding simple dyes, you can create a masterpiece of any color. As an example, we can cite the process of making a three-dimensional still life in the form of a rowan branch:
- Preparing the dough. Ingredients: flour (2 cups), salt and vegetable oil (1 tbsp each), water (0.5 cup). Instead of oil, you can add hand cream. The mixture is divided into 2 equal parts, red gouache is added to one, and green gouache is added to the other. Everything is carefully moved in 2 containers.
- On a dark base in the form of a circle (you can use a flat plate) a small branch of any tree (birch, linden, etc.) is placed. It should not go beyond the boundaries of the base.
- Elongated leaves are molded from green dough, which are glued to the branch one by one, and at the same time fasten it to the base.
- Linear veins are drawn on the leaves in a thin stack.
- Balls with a diameter of 5-7 mm are formed from red dough. A small cross-shaped pattern is made on the side to imitate a real berry.
- The balls are placed in the form of a cluster and connected to the foliage.
- Small branches with leaves are added.
- After the still life has completely dried, using gouache of the desired color, the coloring is made brighter. To preserve the color palette for a long time, acrylic varnish should be applied on top.
You can make all kinds of figures and even beautiful paintings (panels) from the dough.
Interesting! Gift souvenirs with magnets that can be attached to the refrigerator are quite popular. In this case, you just need to place a small magnetic plate inside the dough figure.
 From the dough you can make all kinds of figures and even beautiful paintings (panels)
 Other ideas
Crafts for mom can be very different; the choice depends on imagination and the availability of available materials.
Sweet flowers
Delicious gifts can be made from round-shaped sweets in a wrapper. You will need paper (silver or gold), corrugated paper, wire, polystyrene foam, tin can, PVA glue, adhesive tape. Details for decoration - beads, ribbons, plastic leaves, beads, mesh.
Making a craft in the form of an unopened rose is carried out in several stages:
- The core of the flower. It is made from candies that are wrapped in golden or silver paper over a candy wrapper. The base is firmly secured with wire.
- Flower petals. Each petal is made of pink or red corrugated paper, and the top part is rounded. The core is completely wrapped into a petal. A total of 2-3 petals are laid.
- The bases of the petals, together with the base of the core, are secured with wire.
- A cup of leaves is made from green corrugated paper and secured to the base. Then the base is thoroughly coated with PVA glue.
- The branches are made of wire wrapped in a green paper strip.
- Several roses are collected into a bouquet.
- The vase can be made from a tin can, beautifully decorated with corrugated paper.
- A foam plastic disk is tightly placed at the bottom of the vase, into which the flowers are stuck. The space between the buds should be filled with green ribbons or mesh.
 Delicious gifts can be made from wrapped round sweets
 Heart made of coffee beans
- A template is made from any paper. The outline of the heart is drawn on the sheet and carefully cut out.
- Using the template, identical hearts are cut out of cardboard (2 pieces).
- A wire is glued to one of the hearts, which will serve as a base.
- Both cardboard blanks are glued together, and cotton wool is placed between them to create a three-dimensional figure.
- The outside of the voluminous heart is covered with a layer of cotton wool and wrapped with thread.
- The entire surface is painted brown to provide a uniform background. After this, coffee beans are glued to the canvas.
- A tin can (from instant coffee) is used as a base, which is decorated with colored paper.
- The wire extending from the heart is wrapped with tape or threads with sizing.
- A sponge or foam plastic is inserted into the can base and the heart is fixed.
 A heart made of coffee beans will not leave anyone indifferent
 Balloon flower
Elongated balloons can be an excellent semi-finished product for making a gift flower:
- A red balloon is inflated and the edge is secured to a knot.
- Both ends of the ball are tied together with thread.
- Exactly in the middle the ball bends and twists.
- The resulting workpiece is divided into 3 equal parts and twisted in 2 places.
- The ball is clamped by hand and twisted several times until a flower shape is formed.
- A green balloon is inflated.
- Near the knot, the green ball twists. This small section is placed in the center of the red flower.
- You can put together a small bouquet from these flowers.
 Elongated balloons can be an excellent semi-finished product for making gift flowers
 Gifts are made from scrap materials. Plastic bottles, bottle caps, and various gifts of nature are used. In the process of work, you should not be afraid to make mistakes. It is important to think through the idea well and consult with an adult.
You can make a craft for mom in different ways and from almost any material. She will definitely like a gift made with soul and love. She will keep such a souvenir for a long time, proud of her child.


