A postcard like a heart, made by yourself. Photos of finished cards
The very first big holiday after the New Year is Valentine's Day. Very soon, lovers will begin to intensively prepare for this day: come up with romantic gifts for each other, plan how best to spend this day and, of course, do things first.
It has already become a tradition for Krestik to help you find ideas and inspiration for any reason, so we will start preparing in advance for February 14th!
Let's see how you can make paper valentines with your own hands, so as not to waste too much time, and as a result, get beautiful and original gifts for your loved ones.

To start making a valentine with your own hands, especially if you are planning to make it out of paper and in the shape of a heart, you should prepare a template. If you can easily draw a beautiful heart by hand, then go ahead and get some thick paper and a pencil! If you are not sure that you can do it yourself, then download the heart templates we have selected, print them on a printer and carefully cut out the heart along the outline.
First make a slit with a utility knife, then use small scissors, such as nail scissors.
As a result, you should get something like this, tracing it along the contour on a beautiful sheet of paper and then cutting it out, you will get a neat heart.

So, we figured out how to cut an even and cute heart from colored paper. It's time to choose an idea for decorating your Valentine's card.
Super simple valentines
Let's first look at the simplest methods. A huge Valentine heart can be made from small hearts, each of which is glued to a cardboard base.

Small heart blanks themselves can become full-fledged valentines if you cut them out of beautiful paper and decorate them with buttons.

The valentine card has a special space for the recipient's name or a romantic message.
A full-fledged picture of paper hearts is the height of simplicity and genius!


After watching the video master class, you will learn how to make a heart box with your own hands:
Valentine card with a drawing
The beauty of this method of creating a paper heart with your own hands is that you don’t have to be a talented artist; even a child can make such a valentine.

On a white heart or any other, but preferably a light color, use a regular ballpoint pen to draw simple curls, hearts, flowers and other delights.

Then, using regular watercolors, paint only some fragments:

As a result, you will receive a one-of-a-kind Valentine card!

Such valentines can be given not only to a loved one, but also to friends (after all, we love them too))

By the way, do you know why foreigners write the letters XO on their Valentine cards?
In fact, everything is very simple: X conventionally means “kisses”, and O - “hugs”)
Original master class
Valentine card using a stamp
The method using a heart-shaped stamp is also quite simple and popular when making paper valentines. To do this, you just need to buy one or more stamps. They come in different prints and different sizes:

If you can’t buy it, don’t despair - make it yourself from an ordinary wine cork. Draw a heart and carefully cut it out with a utility knife.

Then apply gouache to the sponge and try to make an impression on a sheet of paper.

Now let's see how to make a Valentine's card with your own hands using a stamp.
Using a small piece of masking tape, carefully attach the blank with a heart inside to a blank for a postcard (you can use a ready-made one, you can fold a sheet of cardboard in half). Then, using a stamp, we fill the entire surface inside the workpiece with hearts, and the color of the hearts can be different shades of red.

After the paint has dried, remove the paper blank and the valentine is ready!

Original master class
Another idea for making a heart stamp is to shape a cardboard toilet paper cylinder into a heart shape, wrapping it with tape to secure it.

With this stamp you can decorate a large sheet of whatman paper on which to write declarations of love!
Valentine's card with hearts
Fans of beautiful scrapbooking paper will definitely love the idea of creating a romantic three-dimensional card with hearts.

The technique for creating a Valentine card is very simple. Using a shaped hole punch, you need to cut out hearts from paper.

The number of hearts should be 2 times greater than what we see on the postcard, because each heart will be double-layered.

In this version of the valentine, all the lower hearts are made of the same type of paper, and the upper ones are made of different ones.
Take a ready-made card base or make one yourself, and then mark the location of the bottom layer of hearts and glue them on thin double-sided tape. Simply sew the upper hearts to the lower ones using a sewing machine - it’s not difficult, the main thing is to be careful.

Original master class
Using the same principle, you can make small Valentine cards:

And voluminous heart-shaped valentines:

If you don't have a sewing machine, sew on the hearts by hand. To do this, first place the paper on a soft surface, such as a towel or ironing board, and then pierce it with a needle, using a thimble to push the needle (watch your fingers!)
Ideas for decorating your home for February 14th
And finally, get inspired with ideas for decorating your home for Valentine's Day. They also won’t take up much of your time, but will definitely create a romantic atmosphere!
Romantic wreaths
The basis of a wreath of paper hearts is a circle made of thick cardboard or a piece of plywood. You can glue the exact same circle of decorative paper on top, and then just stick a large number of hearts on it!

It's even easier to make a wreath from strips of double-sided scrapbooking paper. First bend them in half, and then glue them on top, giving them a heart shape. By gluing such blanks to each other, you will assemble them into an original wreath.

The more hearts, the larger the circumference of the wreath.
Garland of hearts
In addition to the wreath, you can also make garlands with hearts. A shaped hole punch with a heart and a regular hole punch for piercing round holes will come to the rescue.

The garland can also be made from hearts folded from strips of paper (it is based on the “heart” element, borrowed from quilling)

Of course, we will definitely show you more complex and interesting options for creating valentines with your own hands, but if for some reason you need to make a valentine very quickly, you can always use one of the ideas listed here!
A universal selection of gift ideas for any occasion and occasion. Surprise your friends and loved ones! ;)
Friends, hello everyone! Today I wanted some romance, a beautiful manifestation of feelings. What better way to do this than hearts? That is why I will tell you how to make a heart with your own hands.
Hearts are generally my favorite theme - I often give them to family and friends. They are so versatile that they are suitable for literally any holiday, from the classic (February 14) to the exotic (Halloween, for example). If it weren’t for the time limit, I would have churned out hundreds of these wonderful things and overwhelmed everyone I knew))
The variety today will be terrible - from unusual paper ideas to mind-blowing fantasies made of wire. For every taste and color, so to speak.
How to make a heart with your own hands: amazing... simple
I have prepared as many as three dozen ideas for you, so there will be clearly plenty to choose from.
Heart made of balloons
You can make an amazing heart with your own hands if you prepare two long balls (from which you can also twist different animals), thick threads, scissors and silicate glue (you can try experimenting with other glues, the main thing is that they are transparent).
The process is simple: inflate the balloons as in the photo and wrap them with threads soaked in glue. You can apply several layers to make the structure more weighty. After the glue has dried, the balls need to burst and be removed from the finished frame. The tubes then need to be glued together, slightly cutting one. All that remains is to hang it up.

Paper heart
Gentleman
This is a two-in-one craft: you can make a designer box or leave it as a valentine. Probably, this can even be called an almost three-dimensional postcard due to the presence of an intermediate box between the two halves of the hearts.
You will need cardboard or thick paper, scissors, glue, satin ribbon and decorative elements. Cut out all the parts according to the photo and connect. If you want to make a box, then make this one too (numbers 6-7). Glue everything together.

Envelope
A very simple idea. A heart shape is cut out of paper, the side and then the bottom edges are folded. The corner becomes the closing element. If you loosely fasten the edges, you can write wishes on the heart itself in advance and only then fold it.

Heartbreak
To implement this decorative idea, you will need several dozen hearts, make a cut in the center of each of them and glue them together. Such a composition can be placed not only on the wall, but also on a panel.
Tip: you can decorate a pillow with these hearts if you make them from felt.

Little Mermaid Tail
The unusual shape of this souvenir is achieved by repeatedly folding the cut circle like an accordion. After that, you just need to fold it in half and glue it.
Geometry of love
What better way to help you create this heartfelt card? The most important thing here is not to make mistakes with the folds. Great option for Valentine's Day, by the way.

Do-it-yourself heart for your loved one
Undoubtedly, all previous options fit perfectly into this category. But I want to especially highlight a few romantic models for this occasion.
From felt
A classic, but so cute heart that can become either a separate souvenir or an element of an interesting project. For it you just need to cut out two parts and connect them with a “forward needle” seam. Before finishing, stuff the souvenir with padding polyester and sew it up until the end.
Tip: decorate a heartfelt gift with beads, sequins or buttons - then it will sparkle with new colors.

Clip
And again wire fantasies. This time the heart is intended for the ear. You just need to twist the wire so that it forms a kind of clamp consisting of two hearts.
Finally, I advise you to read articles about homemade gifts for your sister and dad - there are also ideas for homemade hearts.
This is where I end and say goodbye to you until the next article. Tell us about your impressions, share links on social media. networks and subscribe!
Sincerely, Anastasia Skoracheva
If you persistently think about hearts, about love, it means that Valentine's Day is approaching. You can express your love, affection, sympathy in different ways, for example, with a handmade valentine.

First of all, cut out a heart-shaped template: fold a sheet of paper in half, draw half of the part. Cut, straighten - you get a neat, completely symmetrical heart.
Transfer the template to medium-density white cardboard.
Since this heart is a postcard, it is better to immediately write a congratulatory text on a white background. At the end of the work it will be inconvenient to do this.

For the main part of the work you will need colored paper napkins, glue (any), scissors, and a stapler. Napkins are sold in a wide range, but it is better to choose thin, soft, cheap ones.

Fold one napkin in half twice. Secure the middle with a stapler.

Trim the resulting square around the perimeter. You should get a circle (not necessarily an ideal shape).

Take the top layer of paper and press it to the center.

Apply the second, then the third and subsequent layers of napkin to the first layer. Leave only the bottom two or three layers that will stick to the card.

Make 10-15 such flower blanks, depending on the size of the postcard template.


The flowers are glued to the base heart tightly to each other. Straighten the crumpled core to fluff the flower.

Different color combinations of elements will look beautiful. To do this, use napkins of different colors.

If you didn’t write a congratulation on a postcard before starting work, then at this stage it’s not very convenient to do so - the flowers will be crushed. Although here you can find a way out: write on a separate piece of paper and stick it to the valentine.

You can fold flowers not only from napkin squares folded in four. If you cut them into four parts and fasten them with a stapler, you will get blanks for even smaller flowers. They can also be used to lay out the surface of the heart, or to fill the empty spaces between large flowers.
Valentine's Day. There are a few weeks left until February 14th, you can already start thinking about a gift, looking for recipes for delicious dishes for a romantic dinner... You can get several sheets of multi-colored paper, scissors and glue and make interesting valentines with your own hands, stylishly decorate your house in romantic colors, beautifully decorate the holiday table.
This article contains the most interesting handmade ideas for Valentine's Day. We hope that with our help, your significant other will remember this day for a long time. So, we will surprise you with all kinds of hearts, let's go!
For these romantic crafts you will need colored paper, scissors, glue, sometimes even wire and salt(!), but we can promise you that you will not need any special skills and secret ingredients that can only be “obtained on a full moon by spitting through an empty well.” » not required!
1. Decorate the house!
Lovers' wreath on the door

Cut out a circle with a diameter of 30-40 cm from plain white paper. Cover it with cut out hearts. Choose the desired tone yourself - the wreath can be made more delicate, using white and light pink hearts, or it can be more passionate, choosing red and burgundy colors. You can make it in a trendy combination of pink and black or in a gothic style using black and red hearts. You can also choose different sizes of hearts - this will make the wreath more voluminous and textured.
An interesting option is a wreath of roses.

How to make, see our detailed.
If you want something more cozy and warm on a cold February evening, pay attention to the option.

You can decorate a door, window or hang it on the wall with a wreath.
Garland of hearts
We string the cut out hearts onto a thread. A very simple and beautiful decoration. Please note that the hearts can be strung either crosswise or lengthwise. If you string it across, you get a vertical garland that can be used to decorate a doorway.

If along, then horizontal - such a garland can be hung on the wall, decorated with it on a bed, a window, or pulled across the entire room under the ceiling.


It's even easier to make a garland with clothespins. Then it is better to cut the hearts out of thicker paper so that they do not become deformed due to the clothespin. And of course, you can attach romantic wishes, favorite photographs, memorable candy wrappers and tickets to such a garland.

Romantic little things
Remember how, as children, we “grew” crystals on sticks in a saline solution? Try making these crystal hearts for February 14th!
The heart can be made from colored wire, after which it must be placed in a concentrated saline solution (gradually add salt to warm water until it stops dissolving). You just have to wait a few days, and to make the heart grow faster, change the solution to a new one every 2-3 days.

And, of course, candles! Decorate candle stands with hearts, but don’t forget about fire safety!

2. Make your own valentines!
The most important paper heart on this day is your Valentine's card. And you can make it yourself and it will turn out no worse than store-bought, even more original! For example, you can send...
Message in an envelope
We string 6-8 hearts on a thread and put them in an envelope...

You can write words on each of the hearts, which will form a phrase as you pull out the hearts. Do not confuse the beginning and the end when putting the message into the envelope, otherwise you will end up with “I love you, I am Zina” instead of “Zina, I love you” :)
A couple more options with envelopes - mini messages with nice words and compliments and an envelope that opens into a heart


Card with hearts
Here are some easy, cute ideas for designing romantic Valentine’s cards:

Another idea for a voluminous card with two hearts flowing into each other - it turns out to be a very symbolic valentine. It will take you only 10 minutes to create it - follow ours and this is what you will get in the end
Here's a video tutorial on how to make a Valentine's card with hearts resembling balloons on strings
Subscribe to our YouTube channel so you don't miss new master classes on Valentine's Day and February 23
Button hearts
Cool cards are made with button hearts - bright and cheerful

Valentines cards with photos
A happy photo of you together can be the best Valentine for Valentine's Day. Add a line of wishes in Photoshop, a few hearts and insert it into a nice frame. Or make a heart from your small photographs

And also Origami Valentines. Watch this simple video tutorial that shows you how to make a beating heart out of a piece of paper.
In nomination "Last Minute Valentine" This simple cardboard heart wins. Your loved one is almost here, but your valentine is not ready? Feel free to tear off a piece of the box and, following this simple video instruction, create a romantic surprise.
3. Let's have fun with our colleagues!
To do this you will need plastic (and basically any) soldiers! On the hearts we write heartbreaking requests for help, such as “Elena Arnoldovna, you killed me with your smile!”, “I can’t fight these feelings anymore!” “I’m dying of love for you,” “I’m completely smitten by your gaze!” We “distribute” the hearts to the soldiers and place the regiment dying of love on the tables of colleagues, window sills and in the cupboard for coffee cups.

4. Have a romantic tea party

Cute tea bags. We have already written about this. You can decorate the entire tea ceremony in a romantic style.
However, you can drink hot tea outside from a thermos and, hugging each other, look at the romantic sky lanterns in the shape of hearts flying into the sky.
5. Making bookmark hearts
What could be simpler - take two hearts of different sizes and glue the small one onto the large one (only the upper part, and the lower bookmark will just “cling” to the desired page!)

6. Bouquets of hearts
We fasten 6-8 hearts together with a pin, attach the pin with the resulting bud to a “twig”, which can be a wire, a cocktail tube or a real tree branch. The flower is ready. We make 5-7 flowers for a bouquet, of different sizes and shades. We “decorate” the petals with wishes and compliments!

And this option will especially appeal to those with a sweet tooth - we secure the flower not with a pin, but with a lollipop candy

7. Delicious love. Cooking a romantic breakfast for your loved one
We will delight our loved one with goodies on this day. I will not include a recipe for baked salmon with exotic sauce in this article; there are many similar instructions on the Internet. Let's focus on the beautiful presentation. Pancakes and scrambled eggs can be prepared in special molds. You can cut hearts from all kinds of fruits and vegetables: carrots, strawberries, bananas, apples and kiwis.
Useful tips
Content:A voluminous postcard made by yourself is a nice gift for a loved one or friend. There are postcards for all occasions, so you can choose for any holiday the right handmade gift.
On our website you will also find:
- DIY postcards for March 8
Make a three-dimensional postcard with your own hands. Eight-bit heart.

This original three-dimensional postcard is quite simple to make, despite the fact that its design seems intricate.
It is ideal for a loved one (girlfriend, mother, grandmother) and the occasion can be any: birthday, March 8 or Valentine's Day.
You will need:
Cardboard or thick paper
Stationery or wallpaper knife
1. First you need to print the card template found in . Just in case there are 2 copies.
* You can try to draw a heart layout yourself using a pencil and a ruler, it’s not difficult.
2. Using a utility knife, make vertical cuts on your template.
3. Now you need to carefully fold the card without creasing the parts. First make the folds, which are indicated by yellow lines in the picture. Next, begin to carefully fold the card.


*The rest of the card should fold on its own. Don't forget to smoothly stroke the card with your fist so that all the elements work smoothly.
* For convenience, you can temporarily attach the postcard to the table using tape.
4. Decorating a voluminous card. You can cover the edges of the card with paper of a different color.
Now almost everything is ready, all that remains is to add warm words.
DIY voluminous postcard. Heart.

Despite its simplicity, this card will look beautiful if you do it right. Anyone can make a Valentine card like this.
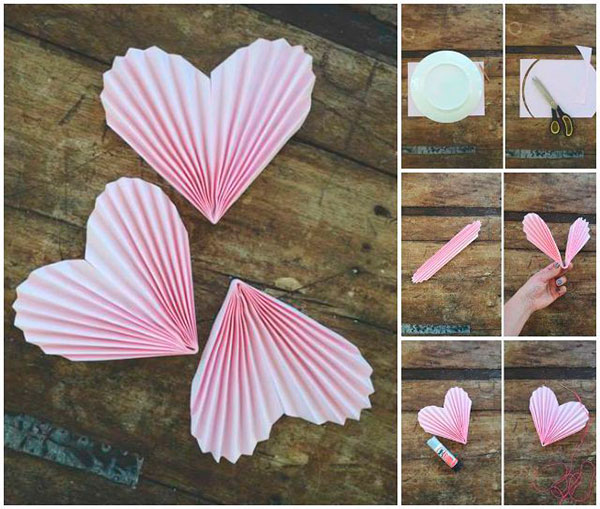
You will need:
White thick paper
Red paper
Scissors.
1. You will need a postcard template (or you can draw one yourself - look at the picture for how to do this).

2. Cut out a card from white paper.
3. Fold the red paper into an accordion shape. Next you need to cut it out.
4. P Glue the resulting hearts to the card.

Ready! All that remains is to decorate to taste and sign.
Do-it-yourself voluminous postcards. Scheme. Rainbow.

This card is very easy to make even for a child.
You will need:
White thick paper
Scissors
Markers, pencils or paints
1. fold the paper in half
2. draw a rainbow as shown in the picture
3. make cuts along the top and bottom of the rainbow
4. Unfold the paper and color the rainbow
* You can add whatever you want to the card, decorate it to your liking using stickers, glitter, etc.
5. Now you need to carefully bend the rainbow out of the paper (see picture)
6. To hide the hole from the cut out rainbow, glue more paper to the back of the card.
When opened, the rainbow should peek out, decorating the world you have imagined in your card.
How to make a three-dimensional postcard. Volcano of hearts.

This card consists of two halves that are glued together.
You will need:
Colored paper
Thick paper
Scissors
* You can try to draw hearts yourself, but you need to know certain rules - they are listed below.
1. Remove the large heart from the middle (it's right on the fold).

2. Cut out the hearts, leaving only their folds intact (see picture).
3. Make cuts on the hearts shown in the picture (gray lines on opposite hearts), this way you can fasten them.

* The card will close better if you cut the paper at the center fold and glue them separately to the base (the base is thick red paper that serves as the background for the card).

4. Glue the halves to the base and connect the hearts in which you made the cuts.
Rules

*The sizes of the hearts on both sides are the same.
*The blue line in the diagram shows that the distance from the fold in the middle to the cut is the same, and the red lines indicate the same distance between the hearts close to the middle of the card.
Volumetric paper cards. Eight-bit weirdos.

This card is ideal for both teenagers and adults.

You will need:
Stationery knife
Ruler (preferably metal)
Postcard size approximately 8.5cm x 6.5cm
1. Download the weirdo or skull template and print it out. You can try to draw them yourself.
Volumetric postcard templates
2. Make cuts in the indicated places (see the picture - where the red lines are to make cuts, where the green lines are to make folds).


3. As you begin to fold the card, your little monster will begin to “hatch” out of the paper. Take your time, do everything carefully.
* If the mold does not come out automatically, try helping yourself with a toothpick or something similar.
4. Glue the card to separate paper, which will hide the holes and serve as a base for the card.

*You can put your postcard in an envelope.
Master class - voluminous postcard "Jolly Crab"

There are different techniques for making three-dimensional cards and this “funny crab” is made using one of the simplest.
You will create volume by gluing the main elements of the card onto bulk tape.
You will need:
Thick paper
Colored paper
Patterned paper
Black beads or felt-tip pen (for eyes)
Bulk tape (or foam)
PVA glue.
* You can replace bulk tape with a piece of foam plastic. To do this, you need to cut out small cubes from foam. The side of one cube should be several millimeters.
* Use glue to glue the foam pieces first to the card elements and then to the card itself.
1. First, you need to download and print this template. You can also draw the same crab or other cute creature yourself.

Three-dimensional paper postcard template
Download the template.Cut out all the main parts of the crab from colored and patterned paper.
2. Prepare thick paper.
Fold it in half to make the base for the card.
Glue patterned paper for the background onto this base using PVA glue.
Glue yellow wavy paper onto patterned paper to represent sand.
Using bulk tape or foam, glue the details of the starfish and jellyfish to the “sand.”
You can decorate the sea friends of the crab with beads.
3. After you have cut out the crab parts from plain and patterned paper, you need to glue it.
Glue the legs of your paper crab to the card base.
Glue the crab's eyes to its body (or you can draw them yourself).
Connect the remaining parts using the same bulk tape or polystyrene foam.
4. Draw a mouth and write any wish.
How to make voluminous cards. Chick.

This card can be prepared for Easter or a birthday, or maybe there is another occasion.
You will need:
Wrapping paper
Thick paper
Stationery knife
Colored paper
Scissors
Ruler
1. First we make two blanks for our postcard. The dimensions of one are 15 cm by 12 cm, and the second is 15 cm by 15 cm. It is on the second base that you will attach the parts. Bend 3 centimeters from the bottom edge of the base (see picture).

2. Step back 3 cm from the left edge and the same amount from the right and draw strips, the width of which is 1 cm and the length of 3 cm. Cut the lines with a stationery knife. It is necessary to make three such strips, since we have three parts.


3. You need to bend the strips forward, and you will get a kind of stand for the postcard parts.

4. Glue the main part of the card to the inner one, as shown in the picture.
*You can decorate the card using wrapping paper. You can paste it over the base.

5. We cut out eggs from thick paper and decorate them. You can use circles cut out of colored paper or made with a stapler, or stickers, glitter.

7. Glue the eggs onto the stands and glue the remaining parts.


